Materials and tools needed:
- Three tops with cool elements and a long jacket zipper, one that separates at the bottom
- Sewing kit
- Sharp scissors
- Lots of Pins
Finding the Three Tops at Goodwill:
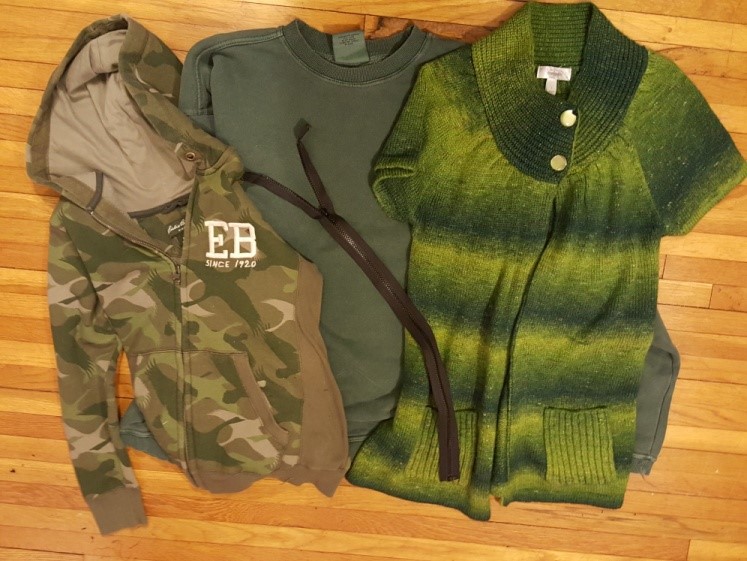 I thought these pieces had such a great color blend when put together. First, I found the sweater and then, I walked around the store with the sweater in hand looking for anything item that would complement it. Spare no department in your quest, men’s, kids, even furniture (think fabric) are all fair game. I came across the plain men’s sweatshirt. The camo hoodie was last. The hoodie and sweater don’t really look good together, but the sweatshirt brings them together. They definitely needed to be combined. I also had a long jacket zipper that I had saved from a previous redo. But how to combine them???.
Here’s a Tip:
I look for details in the clothing pieces that really catch my eye. For example, I love the neckline on the sweater. And of course, who doesn’t like a touch of camo, especially a hoodie.
Establish a Foundation:
I never like all the extra fabric under the arms that always comes with an oversized sweatshirt, so the first thing I did was I turned it inside out and pinned some of the bulk out. 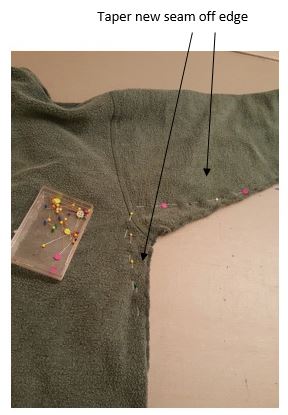
Then I sewed it up, and I made sure to really tapered the new seam to the old side seam, so that it doesn’t fall off the edge abruptly and leave a weird gather.
If you are trying this, I suggest that you try it on and redo if needed. Cut out the excess fabric and turn it back to the right side.
Now, we have a main foundation piece.
Adding On:
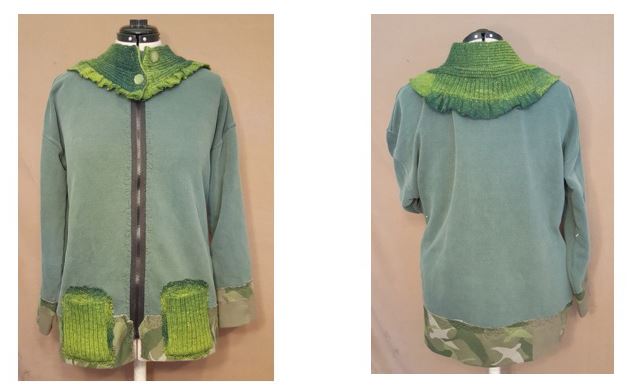
First, I went to the sweater and cut off the neckline collar just below the seam that attaches it to the body.
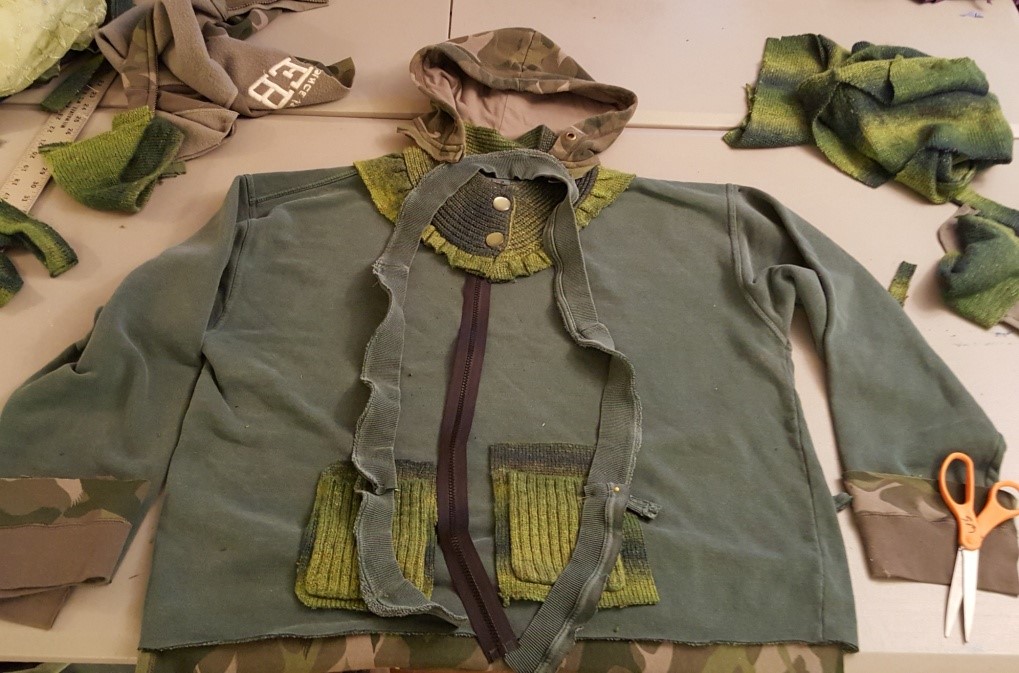 It didn’t fray too much and it made a really cute ruffle which I didn’t expect…happy accident! Then, I put it in place on the foundation sweatshirt. No pins yet. The little pockets from the sweater where great, so I cut them out leaving about an inch of sweater body all around. Then on the body, they went without pins. The hoodie was next. I don’t like sweatshirt wrist bands. They are always so long and clunky. So I cut them off the foundation piece. The wrist bands on the camo hoodie where much softer. I cut them off with about 3 inches of sleeve. Placing them on the foundation body they looked good. I took off the hoodie and just placed it on the neckline area. I wasn’t sure if I liked it. It conflicted with the sweater neckline (I decided on that later). Then I took off the waist band of the foundation body. I don’t like them either they always scrunch up in the wrong places. I cut off some strips of camo and will use that instead,
 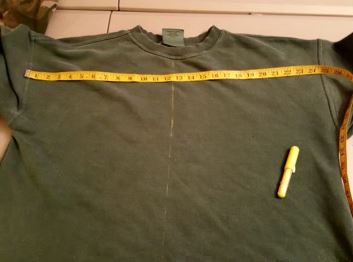 Not bad! The ruffled strip you see in the picture is the foundation sweatshirt waist band. I like to use them as a kind of scarf or tie around the neck. With the zipper in place, I stand back and fuss with the whole thing. Sometimes I have to walk away for a day or so I have fresh eyes when I return. After all that cutting and planning, it is hard to see anything!
Eventually, I decided the hoodie and neck tie have to go. I am happy with everything else. Now all I have to do is put it together. I started with the zipper. It is important to get it centered correctly. It looks like a mistake if it is off a bit. If you want to make it off than make sure it is really off, then it looks like a design element. I used the side seams to get a center and used a tape measure and some chalk or marker to get a center line. Next, I placed the zipper on the line and pin it down. It is Ok if it is a little too long or short. If you are trying it, do not cut the zipper opening yet. Once you get the zipper pinned in place and it looks good, go ahead and pin everything else down. Use lots and lots of pins. They will truly help you keep the material from shifting.
Almost There:
Looks Great! Almost there. 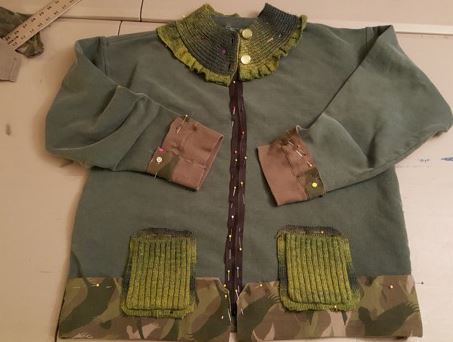 This is the relaxing part. Get your needle and thread or sewing machine and go to work. Don’t worry about being perfect just jump in. I started with the zipper. Once it was secure, I cut it open. It makes it much easier to sew the rest once you can open it up. Continue On! I just kind of wander around at this point.
All Done:
Once everything is secure you can trim some of the excess material off if needed. I like to give it a good steam press. I use a kitchen towel over it if I’m not sure what kind of material it is. I have melted a project before and it isn’t pretty. All Done! Wear and enjoy.
Some Tips for sewing stretchy material like a sweater:
If sewing on a machine and working with a sweater, the feed dogs* will grab the sweater and pull it forward which will create a wavy appearance in the sweater seam. That might be a good look but if that is not what you are going for, put a piece of newspaper or parchment paper under the sweater and sew with that. The paper is slippery so the feed dogs will not grab and pull at the sweater.
After sewing the paper will just rip off .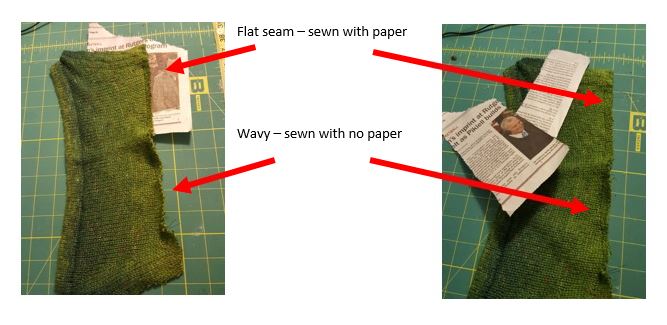
*Feed dogs on a sewing machine are the little teeth like things that travel up and down in a rotating manner just under the sewing area.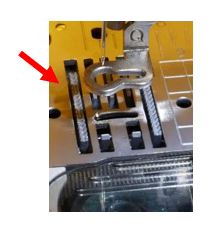

About the Author: Sue MacCombie, Goodwill Keystone Area ReDesign Contest Winner – www.facebook.com/sewingbirdfancies
I look for elements in a piece that are attractive or that catch my eye. I then look for pieces that will blend with it. Sometimes I go with an idea in mind, sometimes I just get inspiration from the pieces I come across. Be fearless with your scissors! Sew outside the lines and combine the unlikely. Trust what you like.